I’ve never given up this space for guests, being as selfish and eccentric as I suppose I am, although I have been asked to do so by some interesting people. Well, I’m changing that today and I may do so in the near future owing to the simple delight of sharing.
This post is written by my best friend, Steve Bare, whose children are who I managed to celebrate at their marriages in California 3 times, whose daughter my own daughter was named for, and about whom I have written before. Jody, Steve’s wife, is featured twice in this blog, for her breathtaking fabric art work. You can see her work here: Jody Bare’s Wearable Artwork This is an uber-talented family I feel wonderfully attached to, as does the rest of my own family. From the day we met – which Steve describes in massive detail – through everything – our days playing junior high and high school sports, Steve’s impressive football playing at Western Kentucky University, his time spent in Viet Nam, through his children’s upbringing and his 20 year English/Journalism teaching career at Aptos High School in Santa Cruz, to his work with Veteran’s issues – Steve and I have communicated and shared our innermost feelings and thoughts. I feel lucky to have a friend who is tolerant and compassionate towards the seeming multitudinous mistakes of my life, who has always “been there” for me, amid all the bubbling confusions which constitute life for us all.
In this guest post, Steve describes his family’s first days in Owensboro, Kentucky. If he – as I hope – develops Part 2, we will see this grand meeting of two hilarious minds, busting with curiosity, mirth and an anarchistic urge which all-too-often got expressed. If he doesn’t, please enjoy a fun tale of adolescence and the small cruelties which can form it – along with the occasional surprise when you discover some strange and effective things can arrive in small packages. Oh, the Humanity!!
My buddy Steve:
It was a few days later when I first met Steve Snedeker, a short time after I’d had my first run in with Eddie, George, and Frank, the toughest kids at Longfellow Elementary School.
It was August of 1960, and my family of five, myself included, had just moved to town a few weeks earlier. The town was a major city by western Kentucky standards, but a 12-year-old on a bike could pretty much explore most of it in a day. I was one of the new kids at the middle class white kid’s junior high school, Southern Junior High, home to the Rebels. There was also Eastern Junior High, where the working class went, sons and daughters of city workers, working parents, mill workers, and a few displaced hillbillies. Western Junior High was home to the black kids an attribute of history; the polite referred to them as Negros, and the Catholic kids went to the all-Catholic Catholic Junior High, the only junior high not named for a relative geographic location, and the only junior high in town that came by its name honestly. Otherwise, had the other schools been named a la Catholic Junior High, my school would have been called Protestant Middle and Ruling Class Junior High.
Our new home was a nice two story bungalow with a big front porch and a broad front yard. It wasn’t the least impressive home on McCrary Street, but close to it. Most of the homes were spacious Southern homes, tastefully designed and located on large, landscaped, unfenced, grassy plots long ago graced with flowering redbud, lush and stately magnolia, willow, and maple. It was one of a number of streets in the same neighborhood that were home to the fairly well-to-do and the country club class whose homes were upstaged only by the mansions on Griffith Avenue, where the landed rich dwelled in lavish brick homes with tall windows, columns, sweeping verandas and servant’s quarters. Folks in these homes were mostly old money who had made it big in tobacco, horse trading, mining, distilling, livestock, and later banking, industrial farming, electricity, oil, and natural gas. Surgeons, lawyers, and rich carpetbaggers would later move in. At least one Jewish family, the Levy’s, lived there too, on the edge of the Promised Land.
The only reason my family lived in the better part of town was because we got to live in a parsonage owned by the First Christian Church, one of the oldest and more wealthy religious institutions from which one hundred members, on the one hundredth anniversary of the church, moved to start a new church dubbed Century Christian Church. My father was hired to be the first minister; it was a good gig in the ministry game. (Two years later we bought our first home a few blocks away in the “wanna be” neighborhood, but I thought it was pretty cool even if Catholics lived there. I liked Catholics.)
The homes across the street from our McCreary Street parsonage were bordered on their back yards by a ten foot wall behind which stretched the Longfellow Elementary School, where my younger brother would later begin fourth grade, and stomping grounds of the aforementioned Eddie, George, and Frank, who I will tell you about later. Further down the street behind the imposing wall stretched the practice fields, the ROTC building, and the venerable old football stadium, Rash Stadium, which would glow and glimmer in the dark of a fall Friday evening when the Owensboro Senior High Red Devils would play under the lights, and a big part of the community would crowd peacefully into the neighborhood for the game. In front of the stadium sat the pride of the town, Owensboro High School, where three years later, after Western High School would be closed, every rich kid, poor kid, white kid and black kid would wind up. (The Catholic kids went on to Catholic High, and such was the order of things.)
The wall was intimidating, but not to a 12–year-old, and the neighbors were ok with kids who lived on the street cutting through their back yards and clamoring over the wall and into the unsupervised, lawless adventure of vast play grounds and an empty stadium that was a piece of cake to get into. (A place where Steve and I would later have some fine, if not very weird, adventures.) It was few days before seventh grade started in the late summer of 1960 that I first scaled that wall, my heart pounding, and I was giddy with the sense of great adventure. The sky was high, and the wind coaxed the first few red and orange leaves from the turning maples, and as they fluttered in the breeze I straddled the wall as if on a giant horse. The adventure couldn’t have gotten any better, but it did. Six kids, more or less my size and age, were playing football on the thick grass of the Longfellow Elementary School playground. I sat there perched on the wall for the longest time, shy, scared, and little, but I could play football, and I was tired of playing with my little brother, and my older brother, six years older than me, was a jerk.
Remember, I had only been in town a few weeks, and the only kids I had met were the church kids, who like me, got into their family cars after the service and headed home or out to eat. The other two were Rick and Cindy Standish, who lived next door, Rick, a nice enough, somewhat nurdy rich kid a year younger than me, and his sister Cindy, smart, beautiful, well developed and the source of many an adolescent wet dream. (Years later, I would smack Rick in the back of the head for forcing his clumsy affections on the younger sister of one of my best buddies during a party in the Lavin’s basement. He really was way out of line, but I regretted hitting him hard enough that he reeled, stumbled and eventually sprawled awkwardly into a chair. I was a tough kid in high school, but not prone to hitting people as benign as Jack. I now wonder if my playing tough guy had anything to do with the night of my first sock hop dance at the junior high?
I had walked the mile or more alone in the dark to the junior high school; I had yet to dance with a girl much less kissed one, but I was ready to try both if the opportunity arose, and I thought I had died and gone to puberty heaven when Cindy, Rick’s incredible older sister, and a covey of the hottest eighth grade girls invited me over to sit down with them on the bleachers. I was giddy with infatuation and about to wet my pants with elation after Cindy bought a Coke for me and offered some Chicklets Gum, a very cool brand to chew. I had popped the third Chicklet in my mouth and was about ready to ask Cindy for a dance. The song, ironically, was “Does Your Chewing Gum Lose Its Flavor on the Bedpost Overnight?” (No lie.) At any rate, about the time my courage was waxing, my stomach began gurgling, and the strange, uncomfortable sensation began to work its way into the small intestine and down into the sixteen feet of large intestine I had only a few days earlier learned about in Mr. Thompson’s science class. My beautiful, but evidently malevolent next door neighbor had slipped me Exlax, the popular laxative of the day sold as tasty chocolate bits or zesty gum tablets, not Chicklets, and the only way to avoid total humiliation of super-soiling myself in front of my classmates was to quickly leave the dance and waddle into the dark evening for the long, often interrupted walk home. So, I guess my fist on the back of Rick’s head was his big sister’s karma come round to haunt him. Later, Steve, who I’m about to introduce you to, and I would camp out on my garage roof on many a warm summer evening and watch Cindy as she preened and prepared in her bathroom, but, as they say, that’s another story, but it is a good one.)
I jumped down from the wall a second or two before my courage waned, got up, brushed myself off, and stood like a stone watching the boys play ball. It was easy to see that there was a big team of three and a little team of three (I knew a great deal more about pickup football games than I did about girls.), and while I had yet to meet any of the kids, it would not be long before I would know well the names of the kids on the “big” team. They were, of course, Eddie, George, and Frank. Eddie was the best athlete and one of the biggest kids in the sixth grade, and he had passed every grade. We would play high school ball together, and I dated his older sister who was the deemed most beautiful girl in school. I even kissed her. George was also big and athletic, but unlike Eddie, he had failed the third grade, would soon be shaving daily, and would quickly lose track were he compelled to count the individuals on his flourishing crop of chest hairs. He would later prove to be a good guy and a good friend, but at the time he could and would beat up almost any kid his age and often wore the sadistic smile of the badass. And finally, Frank. Frank had attended at least two extra grades of elementary school, a big pasty faced kid who smoked cigarettes, knew everything about our deformed versions of sex, and would eventually graduate from Eastern Junior High, matriculate on to Daviess County Juvenile Hall, and later continue his higher education at Eddyville State Prison. I had been watching for a good while when Eddie hollered at me to come play for the “little” team so the game would be more fair, and so they wouldn’t quit playing because of the ass kicking they were getting. I said “Ok.” I was little and the same age as Eddie because my mom had sent me off to school a year earlier than my classmates, but I was a good football player, and if nothing else, my jerk stick older brother had made me tough. I joined the “little” team, none of whom I remembered even though I probably got to know them well later.
George flashed his sadistic, badass grin and flipped the ball at my feet. I let it lay there and I huddled up with the “little” team. This, judging from Frank’s dumb, vacant, yet clearly incredulous look, was my first mistake. It was soon clear in the huddle that my teammates had each had about enough pounding, were close to claiming they had to be home early, and they were more than willing, enthusiastic even, to be blockers or pass catchers, who would suffer enough by getting pummeled by either Eddie, George, or Frank individually but could avoid getting sack piled by all three of them at the same time, the ritual sacrifice of a “little” team ball carrier. I agreed to run the ball, another mistake, but far from my most serious one. I leaned into the huddle and whispered my first play. “Hike the ball on ‘hut three’ and block down to the right. I’ll fake right and go left,” and I’ll try not to get hospitalized, I thought to myself. I barked out the cadence, caught the long hike, faked right and cut back to the left. Two of my tiny teammates, perhaps marginally buoyed by my apparent willingness to die for my new team, actually got in Eddie’s way, and Frank, who wasn’t built for speed, was satisfied with pounding my third teammate into the grass, content, I suppose, to count on George to smash me by himself. It was just George and me one-on-one, and it was then I made my next big mistake. I planted my left foot, switched the ball to my right arm, cut back to the middle of the field, and planted the flattened palm end of a stiff arm on George’s cheek. George went down face first with his arms full of air, and I sprinted untouched to the bicycles that marked the end zone. George bounced up and was about to beat the hell out of me right there. Not only was scoring against Eddie, George, and Frank unheard of, but I used a stiff arm. George was on his way toward me, but fortunately for me, Eddie called him back, evidently impatient to get the ball on offense. I had gotten a reprieve, a stay of execution; I was a dead man, or kid, but it was worth it to watch them take the “sucker’s walk.”
It was their ball now. Frank would hike and block, George would block, and Eddie would run the ball. There was nothing elaborate or tricky about their strategy as the “little” team had never stopped them from scoring the entire afternoon, had never actually tackled one of them, and their only stops occurred when they forced Eddie out of bounds once or when they were beneficiaries of an incomplete pass, three times. On some weird signal (I think it was “corn hole”) Frank snapped the ball back to Eddie and flattened the kid nearest him as George knocked the other two down like bowling pins. Eddie ran straight up the middle, and without a hint of deception proceeded to blow right over me. Then came my final mistake of the afternoon, but it was so good. I lowered my shoulders and shot for his ankles taking his legs out from under him and sending him face first into the grass. Eddie was scary angry, somewhere between crying and homicidally out of control. I prepared for my beating when he stepped back and shouted at me. “Your ass is grass, and I’m a lawnmower,” he screamed, but I didn’t know whether to be scared or start laughing. It was the strangest, and one of the least frightening colloquialisms I had heard up to that point in my young life, but I prepared myself, nonetheless, for the brutal mowing and bagging I was about to receive. My teammates had begun walking cautiously to their bikes now that all the attention was on me, and the “big” team huddled up for the last time that game. I had considered running when Eddie caught me by surprise. Instead of a throw down that afternoon, he challenged me to meet him at this same time and place in three days, the day before school started, and he would, I could only assume, give me my mowing then. That day would be the same day I would meet Steve.
 Which do I prefer? Renovating an existing place or working with new homes, set on earth and nothing else? In landscaping, it’s almost a tossup. Going in and facing this totally blank tableau of dust and flat or steeply-angled dirt has much appeal. So much appeals immediately – images form based on one’s experience and garden design logic based on the past. The very idea of wrestling something civilized and becoming out of simple bare earth has a rare fascination. (enlarge all pictures by left-clicking the image)
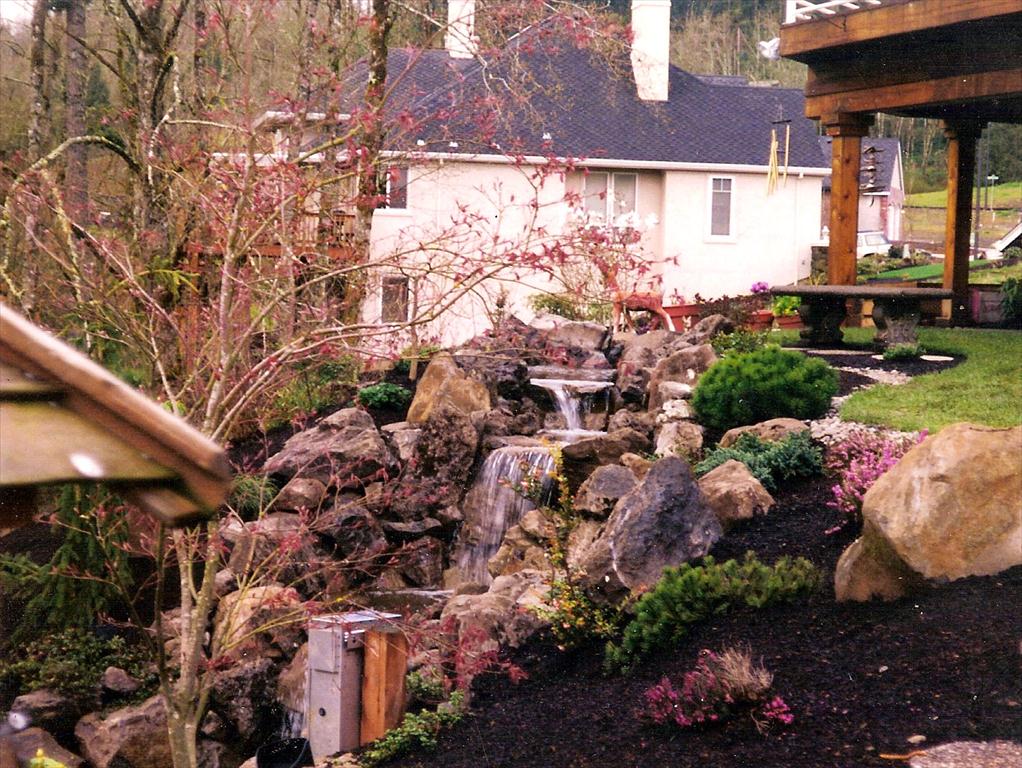
  I have always depicted landscaping itself as an “Ultimate Cosmetic”. There are very few trades indeed who literally “finish” the expanses we deal with on a daily basis. I was told by the owner of this home, below, to “do what I wanted”. It was 10 acres. 😉 Sure enough, we did and he paid happily for the service. We began, more or less, right here:
 And we ended up with these two views – for a microcosmic look at progress:


 What you see on the periphery of this pond and patio was what was at the exact spot that pond now lies. To even call this a renovation is almost funny because it involved such epic change and deconstruction first.